Crazy for Carrots
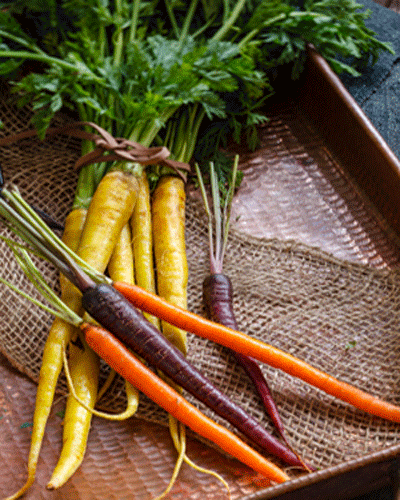
The humble carrot has a long history. Early records mention the use of its leaves and seeds for medicinal purposes, and slowly over the centuries selective breeding has produced the edible root we recognise. Native to Europe and parts of Asia, it was originally purple. Over time, the red, yellow, white and orange varieties are recorded, with the appearance of orange in 17th-century Netherlands. As tempting as it is to accept the story that the orange carrot was developed by the Dutch to honour William of Orange, there is thought that perhaps because the word orange (from the Spanish naranja, referring to the orange tree), was not in use until about this time, and carrots, which may have been orange were previously described as red-yellow. Some early paintings do show orange-coloured carrots, but this is not conclusive evidence as the accuracy of the paint colour cannot be relied upon. The moment of glory for the carrot was perhaps during WWII in Britain, when it was attributed to the success of the RAF’s night-flying bombers. The story was put out that because the pilots ate carrots in quantity, their night vision was greatly improved by the intake of beta-carotene and Vitamin A. In fact, this was also a government ruse to hide the knowledge of the development of radar from the Germans. The British Government had a dual purpose in promoting this story — there was a glut in carrot production, a boon during food shortages. In order to get the population to eat more of the vegetable, the attractive idea of improved night vision was circulated, an attribute that was particularly useful during black-outs. There is some element of truth to the belief that carrots are good for the eyesight, but it is only in the case of a dietary deficiency of Vitamin A that the consumption of carrots is beneficial.
SELECTION, STORAGE AND HANDLING: Carrots are available year-round, but best in the winter months. They store well, refrigerated in a sealed plastic bag or container. The trick is to keep them hydrated — removing the leafy green tops before storing is important, as these draw water from the root. Peeling before use is unnecessary, preparation can be restricted to scrubbing or washing and removing the top and tail.
CARROTS go with: Cinnamon, nutmeg, cumin, harissa, caraway, cabbage, peas, beans, potatoes, cream, butter, ginger, dill, thyme, parsley, honey, seed and Dijon mustard, corned and pickled meats.
Carrot and besan pancakes
Serves 6–8
- 1 large carrot, peeled and shredded
- 1 green onion, sliced thinly
- 1 mild green chilli, seeds removed and sliced thinly
- 1 clove garlic, crushed
- ½ cup besan (chick pea) flour
- 2 eggs
- ½ cup full-cream yoghurt
- Ghee and mustard oil, for frying
Place all ingredients, except ghee and oil, in a large bowl. Mix together well.
Heat 1 tablespoon each of ghee and mustard oil in a heavy-based frying pan, over medium heat. Add a heaped tablespoon of the pancake mixture and cook until bubbles appear in the top surface. Turn and cook until browned underneath and cooked through. (Do not make the pancakes too thick or large, they will take longer to cook through, and probably break when turning.) Cook pancakes in batches, then serve with chutneys of your choice.

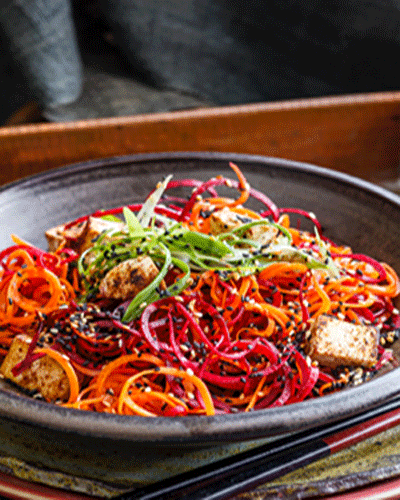
Winter Carrot Salad
Serves 6
- 1 orange and 1 purple large carrot, julienned or shredded
- 2 green onions, sliced thinly on the diagonal
- 1 tablespoon sesame seeds
- 1 teaspoon nigella (also known as kolonji) seeds
- 1 teaspoon black sesame seeds
- 250g firm tofu, drained and cut into 2cm cubes
- 1 tablespoon five-spice powder
- 1 tablespoon mustard oil
Dressing
- 3 tablespoons brown rice vinegar
- 1 tablespoon sesame oil
- 2 star anise
- 1 shallot, finely chopped
- ¼ teaspoon salt flakes (black, if you have it)
- 1 teaspoon brown sugar
Place carrot and green onion in a salad bowl. Combine seeds in a frying pan and dry roast for 2–3 minutes, until aromatic. Tip into salad bowl.
Lightly sprinkle the tofu with five-spice powder. Heat mustard oil in frying pan over a medium heat, add tofu and fry until lightly browned on all sides. Tip into bowl. Combine dressing ingredients in a saucepan, place on medium heat until beginning to bubble, then pour over salad. Serve at room temperature. This salad also keeps well, refrigerated.
Note I used a Japanese Benriner vegetable spiral slicer to make the tangled carrot shreds.
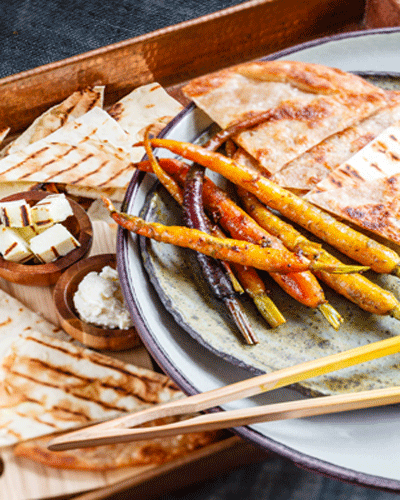
Pickled Duck Carrot
- 1 tablespoon fenugreek seeds
- 1 tablespoon black mustard seeds
- ¾ cup mustard oil
- 2 jalapeno chillies (hot), seeds removed, flesh cut into thin strips
- 5cm piece fresh turmeric, peeled and finely grated
- 1 tablespoon fresh curry leaves
- 2 stalks lemongrass, trimmed, halved lengthways and cut into 10cm lengths
- 1 tablespoon salt flakes (smoked is good)
- 3 bunches baby (Dutch) carrots (use a mixture of purple, yellow and orange if you can) scrubbed and stalks trimmed to 2cm
- ½ cup lemon juice
Place a deep frying pan over a medium heat, add mustard and fenugreek seeds, cover and cook about 1 minute until seeds begin to pop. Add oil, then chillies, turmeric, curry leaves, lemongrass and salt. Heat gently, then add carrots. Turn to coat with oil and spices, cover pan, reduce heat to low and cook 15 minutes. Add lemon juice, cover and turn off heat. Stand for 20 minutes, then pack carrots and some of the lemongrass into sterilised jars. Strain oil, discarding solids, and pour oil into jars. Seal. Serve as an appetiser with hot naan or roti bread, grilled cubed paneer or fresh ricotta. The carrots can also be served with grilled meat, fish and chicken, with rice and yoghurt.
Note: To avoid chilli burn and turmeric staining your fingers, prep gloves are a good idea for handling these two ingredients.
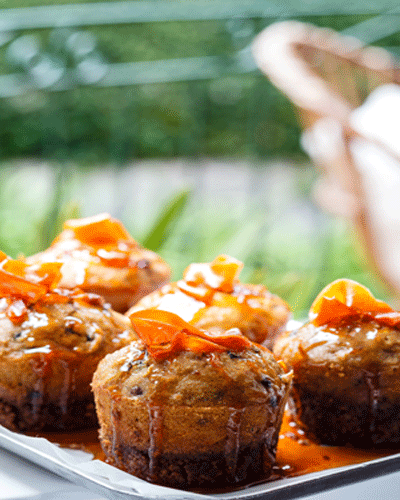
Carrot and walnut cakes with glacé carrot
Makes 8
Walnut base
- 2 cups walnut pieces
- 90g unsalted butter
- 1 teaspoon ground cardamom
- 2 tablespoons dark brown sugar
Cake mixture
- 1 cup plain flour
- ⅔ cup fine or dust polenta
- ½ cup demerara sugar (or raw sugar)
- 1 teaspoon ground cinnamon
- 1 teaspoon ground ginger
- 1 teaspoon baking powder
- 3 eggs
- 2 tablespoons walnut oil (or other nut oil) plus extra for brushing tins
- 125g sour cream
- ½ cup currants
- Grated rind and juice of 1 lemon
- 1 cup finely grated carrot
Glacé carrot
- 1 cup demerera (or raw) sugar
- 1 cup water
- 1 tablespoon lemon juice
- 2–3 green cardamom pods
- 1 carrot, shaved with a vegetable peeler into long ribbons
Preheat oven to 180°C. Brush 8 x 1-cup baking tins with oil, cut small squares of baking paper and place in base of each tin. In a food processor combine ingredients for walnut base and process to a smooth paste. Place 2 tablespoons of mixture into each tin and spread to cover base. Place tins on a baking tray, and then into oven for 20 minutes. Meanwhile, prepare cake mixture. Combine dry ingredients in the food processor (using the same bowl) and blend until well combined. Add eggs, oil and sour cream and blend again. Combine currants, lemon rind and juice in a small saucepan and heat until simmering, then remove from heat (or combine in a bowl and heat in microwave for 2 minutes). Add to grated carrot in a large bowl, pour in the cake mixture and stir until well combined. Spoon about 3 tablespoons of mixture onto cooked base in each tin, return to oven and bake 30 minutes, until cakes test done when a skewer is inserted into the centre. Remove from oven and cool on a wire rack. When quite cold, remove cakes from tins and place on a baking tray (if you remove
the cakes while still warm the bases may crumble).
For glacé carrot, combine sugar, water, lemon juice and cardamom pods in a medium saucepan. Heat, stirring to dissolve sugar, until boiling. Add carrot and simmer for 30 minutes, checking to adjust heat if necessary to prevent burning. When carrot begins to look translucent, use tongs to lift each strip from syrup, and arrange a little pile on top of each cake. The syrup can either be spooned over the cakes at this stage, or reserved, reheated and added just before serving. Makes 8 x 1-cup cakes. Alternatively, use a 23cm deep fluted flan tin, or spring-form tin, and increase the second-stage cooking time to 35 minutes, or until the cake tests done with a skewer.